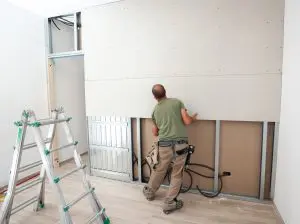
Sanding drywall can be a difficult skill. You need to pay attention to details and be careful. It involves the use of sanding tools, sandpaper, and joint compound. Before you begin a drywall project, prepare the area by cleaning out the dust, tapering, and sealing any doors. Also, make sure to invest in a double trap dust mask. This will help prevent drywall dust from getting into your eyes.
Sanding sheets can be purchased in pre-cut sheets, which will fit most sanding instruments. These sanding sheets are available in grits of 100 to 120. These products are best used for sanding plaster joints and drywall joints. For sanding bare surfaces, however, you might prefer a coarser grind.
When sanding drywall, you'll want to avoid going over electrical box openings. Doing so could cause the paper on your drywall to crack. Sanding around seams, fasteners and other points is safer. As long as you don’t press too hard, it should be okay.

Once you have sanded down the seam and fastener, it is time to apply a second coat. This will smoothen and make the transition between drywall and seams easier. This can be done with a wide-bladed or sandpaper and more mud. It is best to use the sander in circular buffing motions.
The best sanding sheets are the Useit Hook 'n Loop Sanding Rectangle Sheets. Aluminum oxide is a synthetic metal that cuts easily and wears uniformly. They are available in 120 and 80 grit, and are made without glue. They allow for maximum dust elimination across the entire surface.
You can also buy a sanding sponge to replace sandpaper. Although this is less convenient, it will allow you to reach places that sandpaper cannot. Sanding sponges are also more durable. They are also much less expensive than sandpaper and lighter than sandpaper. Sanding sponges are an excellent choice for drywall that is not yet textured.
To avoid damaging a wall with too much pressure, don't use too high a pressure. A pro will recommend using moderate to light pressure. A pro will recommend that you use moderate to light pressure. Otherwise, straight lines could be created in your drywall, which can cause depressions. A corner shouldn't be sanded within a few inches. To remove the sanding dust from corners, you will need a sponge.
Sanding drywall can also be done with a sandingscreen. This inexpensive tool can be purchased at most hardware shops. In fact, it's a common tool that drywall finishers use. Pre-cut sheets are usually available at major box stores. If you plan to use the sanding screen in a drywall project you will need to ensure that it is waterproof.
Another way to sand a drywall project is to use a hand sander. However, some people prefer to use the damp sanding spongy. This technique is more difficult. Although the sanding sponge may be used in lieu of sandpaper for fine-tuning, you should still use sandpaper.
FAQ
Is it possible to live in a house that is being renovated?
Yes, I can live inside a house while I renovate it.
Can you live in a house and have renovations ongoing? The duration of the construction works will affect the answer. If the renovation lasts less then two months, then it is possible to live in your home while it is being constructed. However, if the renovation project lasts longer than two months, then no, you cannot live in your home while the renovation is taking place.
It is important that you do not live in your home during major construction. There is also the possibility of dust and noise pollution from the heavy machinery at the job site.
This is particularly true if you live on a multi-story home. In such cases, vibrations and noises from construction workers may cause irreparable damage to your property.
You will have to live in temporary accommodation while your home renovations are underway. This means you won't be able to use all the amenities in your own home.
When your dryer and washing machine are in repair, for example, you won't have access to them. In addition to the unpleasant smells of chemicals and paint fumes, you will have to endure the noises made by workers.
All these things can lead to anxiety and stress in your family. It is therefore important to plan ahead so that you don't end up feeling overwhelmed by the situation.
When you decide to start renovating your home, it is best to do some research first so that you can avoid making costly mistakes along the way.
Also, it is a good idea to get professional help from a reputable contractor in order for everything to go smoothly.
How do you choose a good contractor to work with?
Ask family and friends to recommend contractors. Also, look at online reviews. Check to make sure the contractor has experience with the type of construction you are looking for. Request references and make sure to verify them.
How much does it set you back to renovate your house?
Renovations cost typically $5,000 to $50,000. Renovations can cost homeowners anywhere from $10,000 to $20,000
How can you avoid being ripped off during renovations to your house?
The best way to avoid being ripped off is to know what you are paying for. Make sure you read every word of the contract before signing it. Also, don't sign blank contracts. Always ask for copies of signed contracts.
How many times should I change my furnace filter?
This depends on how often your family will use their home heating system. You may need to change your filter more frequently if the temperature drops and you plan on being away from home during colder months. If you are not likely to leave your house for long periods of time during cold weather months, you might be able make more frequent changes.
A typical furnace filter lasts approximately three months. This means that you should replace your filters every three months.
You can also consult the manufacturer's recommendations regarding when to change your filters. Manufacturers recommend changing your filter after each heating season. Other manufacturers suggest waiting until visible dirt builds up.
What should I consider when buying a new home?
Before purchasing a new home, make sure that you have enough money saved up to cover closing costs. Refinancing your mortgage might be an option if you don’t have enough cash.
Statistics
- ‘The potential added value of a loft conversion, which could create an extra bedroom and ensuite, could be as much as 20 per cent and 15 per cent for a garage conversion.' (realhomes.com)
- A final payment of, say, 5% to 10% will be due when the space is livable and usable (your contract probably will say "substantial completion"). (kiplinger.com)
- Rather, allot 10% to 15% for a contingency fund to pay for unexpected construction issues. (kiplinger.com)
- Most lenders will lend you up to 75% or 80% of the appraised value of your home, but some will go higher. (kiplinger.com)
- It is advisable, however, to have a contingency of 10–20 per cent to allow for the unexpected expenses that can arise when renovating older homes. (realhomes.com)
External Links
How To
How do you plan a complete home remodel?
Research and careful planning are essential when planning a house remodel. Before you start your project, here are some things to keep in mind. You must first decide what type home improvement you want. You could choose from different categories such as kitchen, bathroom, bedroom, living room, etc. Once you've decided on which category to work on you will need to calculate how much money is available for your project. If you do not have any previous experience in working with homes, it is best that you budget at least $5,000 per bedroom. If you have experience, you may be able to manage with less.
Once you have established how much you are able to afford, you will have to decide on how big a job to do. If your budget only allows for a small renovation of your kitchen, you will be unable to paint the walls, replace the flooring or install countertops. On the other hand, if you have enough money for a full kitchen renovation, you can probably handle just about anything.
Next, look for a contractor with experience in the type or project you are looking to tackle. This will ensure you get quality results and save you a lot of hassle later. Once you have found a reliable contractor, it is time to start gathering supplies and materials. Depending on the project's size, you may have to buy all of the materials from scratch. However, it is possible to find everything you need in a variety of shops that sell premade items.
Once you've gathered the supplies needed, it's now time to start planning. Begin by sketching out a rough plan of where furniture and appliances will be placed. Next, design the layout of your rooms. Remember to leave enough space for outlets and plumbing. Make sure to position the most visited areas close to the front door. Visitors can also easily access them. Last, choose the colors and finishes that you want to finish your design. Keep your designs simple and in neutral tones to save money.
Now that you're finished drawing up your plan, it's finally time to start building! It's important that you check the codes in your area before you start construction. Some cities require permits while others allow homeowners to build without one. To begin construction you will first need to take down all walls and floors. The next step is to lay plywood sheets on your new flooring. Next, you'll attach the wood pieces to the frame of your cabinets. Finally, attach doors to the frame.
There are some final touches that you will need to make after you are done. You'll likely want to cover any exposed wires and pipes. You will need to use tape and plastic sheeting for this purpose. You will also need to hang photos and mirrors. Keep your work area tidy and clean at all times.
You'll have a functional home that looks amazing and is cost-effective if you follow these steps. Now that your house renovation plan is in place, you can get started.